Tuesday, August 30, 2011

Undip words for bipartite baskets

A bipartite map is a map that admits a two-coloring of the vertices such that no edge connects two vertices of the same color. Bipartite maps have duals that are chess-colorable. The map operations radial, Ra(), ortho, Or(), and bevel, Be(), yield maps that are bipartite when the base map is orientable. Only bevel guarantees that the resultant map is trivalent, that it is hamiltonian if the base map is connected, and that the dual triangulation is eulerian.


The quadrilateral truchet tiles for these map operations can be suitably pre-colored to show that the result is bipartite: in radial, the new vertices can be given the same color; in ortho, the central vertex can be given a different color; in bevel, diagonal pairs of vertices can be given the same color.

Guitter, Kristjansen, and Nielsen in an article on statistical dynamics and 2D quantum gravity, Hamiltonian Cycles on Random Eulerian Triangulations, have, in effect, counted the number of undip words of length 2n that describe bipartite baskets.


The integer sequence of undip words for bipartite baskets, starting {2, 8, 40, 228, 1424... } is cataloged as sequence A116456 in the Online Encyclopedia of Integer Sequences. The sequence for general baskets, starting {2, 10, 70, 588, 5544...} is A005568.

Bipartite undip words include:

synonyms for the theta graph, e.g., ud

synonyms for the digonal prism, e.g., udud

synonyms for the cube, e.g., uunnddpp.

Non-bipartite undip words include:

synonyms for the tetrahedron, e.g., undp

synonyms for cuneane, e.g., uunddupd.

Monday, August 29, 2011

Table of map operations important in weaving


In this expanded table, map operations are paired side-by-side with their duals.

Friday, August 26, 2011

Is Bevel the Holy Grail of undip basket making?

The map operation bevel, Be(M), converts any map into a trivalent, highly hamiltonian map. That makes it describable in undip, in fact it guarantees that it has many shape synonyms, and thus offers many options in choosing a working order for making the basket.

What does a map transformed by bevel look like? The surfaces below were all triangle meshes before bevel got its hands on them.


Thursday, August 25, 2011

Truchet tiles for the map operations important in basket weaving


DUAL OPERATIONS

A pair of map operations A() and B() are considered dual to each other if (refer to George W. Hart's page on the Conway Notation for Polyhedra):

A(M)=Du(B(Du(M))

In this chart the dual operations are:

Id() and Du(),

Ra() and Me(),

Ki() and Tr(),

Ko() and Le().


ROTATION PAIRS

Also of interest are pairs of map operations that we will call rotation pairs, i.e., pairs for which:

A(M) = B(Du(M)) and B(M) = A(Du(M))

Rotation pairs in the chart above are:

Ki() and Ko(),

Tr() and Le().


ROTATION SELF-PAIRS

Map operations with four-fold rotational symmetry are in a sense their own rotation pairs. The ones in the chart above are:

radial, Ra();

medial, Me();

expand, Ex().

The map operation dual, Du(M), rotates the edges of the base map by 90 degrees (compare against the identity operation, Id(M).) Because they have four-fold rotational symmetry, the self-paired operations are unaffected by such a rotation in the base map. They produce the same resultant map whether they operate on a given base map or on its dual.

MAP OPERATIONS THAT YIELD BASKETS

Medial, Me(), and expand, Ex() (expand being the same as medial taken twice,) always yield four-regular, chess-colorable maps. Such a map specifies a chiral pair of plain-woven baskets. Rarely do we need to specify the chirality of weave we have in mind, so I use the term loosely and refer to every four-regular, chess-colorable map as a basket.

Every map can be operated on by medial, Me(), and therefore every map specifies a basket. We will call that basket its medial image.

Every four-regular, chess-colorable map is the medial image of some other map and of that map's dual. We will call those other maps its medial bases.


MAP OPERATIONS THAT YIELD TRIVALENT MAPS

In genetic (a.k.a., undip) fabric construction we are interested in trivalent (a.k.a., cubic) maps, which are maps with three edges meeting at every vertex. The map operations in the chart above that always yield trivalent maps are:

truncate, Tr();

leapfrog, Le();

bevel, Be().


MAP OPERATIONS THAT YIELD HAMILTONIAN MAPS

In genetic fabric construction we are also interested in hamiltonian maps, which are maps that possess a closed path that visits every vertex exactly once. In the chart above the map operations that always yield hamiltonian maps are:

expand, Ex();

bevel, Be().

The argument presented in the previous post shows that this is true for Mrs. Stott's expansion operation, Ex(). When seen as a further development of Ex(M), the action of bevel, Be(M), is to split each vertex of Ex(M) into two connected vertices, thus further enlarging the connected ring of vertices that surround the former location of a single vertex in M. In the image below, the former location of a vertex in M is shown by a dotted circle, and nearby portions of a hamiltonian circuit are shown in red.


Bevel's splitting and reconnection of vertices neither interrupts hamiltonian circuits that were in Ex(M), nor creates any new vertices that are not incidentally visited by the corresponding circuit in Be(M). We conclude that the map operation bevel, Be(), also always results in a hamiltonian map.

Maps produced by medial and bevel are actually quite abundantly hamiltonian since they possess a a hamiltonian circuit for every spanning tree in the base map. That allows freedom in choosing a working order for an undip basket.

PLACING TILES

To place truchet tiles, we must first perform Ra(M) or Ki(M) algorithmically to locate the boundaries of the tiles. The difference between Ra() and Ki() is that Ki() includes the original edges of the base map.


Way to go Mrs. Stott

I mentioned in my presentation at ISAMA last June that the map operation snub, Sn(M), which is Mrs. Stott's expansion operation Ex(M) plus an added chiral edge, makes a diamond-pattern tensegrity from any base map. The bow, the kite frame (X-module tensegrity,) and the classic three-strut tensegrity are inventions that made their separate appearances in human history centuries apart. It is remarkable to see them all fall from Mrs. Stott's expansion operation when applied to the simplest maps.


It occurred to me last night (while relaxing at the Strathmore Ukelele Festival) that I had missed another remarkable property of this map operation: the resultant map is always hamiltonian. In particular, any spanning tree in the base map (it's guaranteed that there is at least one spanning tree in any connected map) specifies a hamiltonian circuit.


To see that this is true, consider a fanciful strategy of walking "around the outside" of a spanning tree of the map M in a counter-clockwise direction. This strategy lets us visit every vertex of the tree in a closed cycle, but at the cost of visiting every edge twice (seeing the edge as an isthmus, we will be traveling along it once on each shore and in opposite directions) and visiting each vertex a number of times equal to its valence in the tree. Mrs. Stott's expansion duplicates edges and vertices just enough (times-two for the edges; times-the-valence for the vertices) to eliminate these duplicated visits. That turns our fanciful trip around a spanning tree in the old map into a guaranteed hamiltonian circuit in the new map.

Wednesday, August 24, 2011

More on ply-split braiding of baskets

Mathematically, a plain-woven basket embodies a 4-valent, chess-colorable map. Such a map can be generated from any base map M, by the map operation of taking its medial, Me(M).

A visual way to think about a map operation such as medial is as a quadrilateral truchet tiling. Every edge in a map is associated with a quadrilateral domain of the surface. The union of all of these quadrilateral edge domains is the surface itself. Ironically, the task of drawing an arbitrary map on a surface, which seems so free—a dessin d'enfant—also accomplishes the goal of sudividing the surface into quadrilaterals, a task that might seem workaday and onerous. The map operation kis, Ki(M), makes explicit the boundaries of these quadrilateral edge domains.


A quadrilateral edge domain—save for the edge itself, and a portion of the vertices at each end—is empty. Using the technique of truchet tiles we can replace this empty quadrilateral region with a tile decorated with new vertices and new edges, plus any subset of the old edge and vertices that we wish to keep. For example, a truchet tile for medial leaves out the original edge and both its vertices (for comparison, a truchet tile for the map operation identity, Id(M), reveals the original edge):


If our truchet tiling (and weaving) is not to be arbitrary, our truchet tiles must all be identical, and their placement must be automatic.

In an undirected map (i.e., one where edges are not decorated with arrows,) we discover that we have an option in placing quadrilateral tiles: we can rotate them 180 degrees in the plane, and they still line up with the old edge. In consequence, we will be adding monkey-business to our map (directing an edge) every time we place a tile—unless, of course, the decoration on the tile itself has two-fold rotational symmetry, then our choice will make no substantive difference. (Thus, amazingly, any 2D periodic structure or mechanism that can be expressed as a quadrilateral truchet tile with two-fold rotational symmetry can be applied to any map of an any surface.)

Monkey-business not being what we're looking for, we are limited to weave crossings having two-fold rotational symmetry. The ply-split crossings illustrated in the previous post lack this.

Peter Collingwood's article "Ply-Split Braiding" in Weaver's issue 29 illustrates a twined linking that does have the required symmetry:


But then we'll be back to using bent twongs.

A possibly better option, which is really just ordinary braiding with a twist, is to open out each cord into a 2x2 woven crossing:

Monday, August 22, 2011

Straight twongs: unit ply-split braiding

Twongs don't have to be bent (it saves some trouble if they aren't.) Both 2-ply and 3-ply twongs can be made without the usual bends if they are to be used in a kagome weave pattern. (This familiar tessellation of hexagons and triangles is the medial of both the regular tessellation of triangles and of the regular tessellation of hexagons.)


The crossings at the vertices are 2-ply over 2-ply and belong to the technique of ply-split braiding.

The ply-split crossings are especially advantageous with twongs because they "lock" and cannot be undone by simple untwisting.

Here is a small sample of 2-ply, unit ply-split or UPS braiding in a kagome weave.


Brawny 3-ply twongs

An important trade-off in the design of twongs is the length of the overlapped, or 2-ply section. If the 2-ply section is short, the junction is not strong. If it is long (it can be extended to up to 50% of the inter-vertex distance) it creates a concentration of bending stress that prevents the composite member from bending smoothly. The maximum overlap is limited to 50% of the inter-vertex distance because the overlaps from each vertex cannot overrun each other if the construction is to remain 2-ply.

Going to a 3-ply construction, i.e., where the twongs are formed by twisting a triple strand of wire, opens new possibilities.

In a 3-ply construction the overlaps can now be 100% of the inter-vertex distance. That means the inter-vertex distance can be cut in half for the same length of overlap, permitting much brawnier and stronger structures to be built. The structure at the vertex is still single-ply as before, but the overlapping of the overlaps makes for a 3-ply composite structure between vertices.

All baskets are closed

Baskets lie at the transition between knots and surfaces. Put another way, it is in contemplating baskets that the questions we ask about knots begin to supplant the questions we ask about surfaces. As a case in point, it can seem arbitrary to insist (as is always done in map theory) that a surface be closed, i.e., that it can have no boundary. On the other hand, in knot theory it would be absurd to posit a knot with a boundary.

It may seem intuitive that baskets need not be closed (what earthly use would a closed basket be?) But, in truth all baskets are closed. To see this we have to look more closely at the nature of the selvage, the proper weaving termination of a basket at its mouth.

Here are representations of properly selvaged basket openings of 3, 4, and 6 sides.


They can be tiled together to form a plain (i.e., strictly over-and-under) weaving:


Every plain-woven basket is entirely composed of such properly selvaged openings. There is no other sort of opening or boundary in a properly selvaged basket. In that sense, all baskets are boundary-less and therefore closed.

Saturday, August 20, 2011

Swamp backstroke update

Yesterday I finally found the increment of speed I've been looking for half the summer. The speed key in the high-gear of the swamp backstroke is to bring the inward sweep of your hand very close to your hip. I can think of several reasons why this works, but it does work amazingly. I could feel myself making a bow wave (for the first time ever,) and every so slightly going prow-up like a motorboat.

Pick any or several of these reasons:

the well-known clap-fling effect may help reverse the circulation of the flow around your hand for the return outward sweep,

because flow velocity next to your body can only be straight downstream, forcing the slipstream of your hand against your side converts some of the useless side-to-side momentum of the slipstream to downstream momentum,

by applying your thrust near the widest part of your body, you energize the boundary layer in a way that reduces drag,

keeping the thrust-producing maneuver as inboard as possible reduces drag from the shoulders and arms in making the stroke.
Also, the muscular effort in this position seems easier.

I can only say that the swamp backstroke is already fun and getting faster.

The dream would be to somehow combine this hip-clapping underwater stroke with the underwater dolphin kick to make an underwater backstroke, surfacing only intermittently to spout like a dolphin. I'm not nearly athletic enough to try that.


Thursday, August 18, 2011

The Swamp Backstroke: a new swimming stroke with two "gears"

The swamp backstroke is a stealthy, medium-speed swimming stroke propelled solely by underwater movements of the arms and hands. It is particularly suited to shallow water.

I am certainly not the first person to try this method of swimming—which in essence is simply floating on your back and propelling yourself with sculling motions of your hands—but I am coining the name and publishing these observations in the hope of getting more people interested in developing this useful swimming stroke.

The swamp backstroke, in common with other backstrokes, has two familiar characteristics:

breathing is unimpaired,

you can see everything around you, but not where you are going (extreme caution around pool walls and other swimmers is urged.)

The swamp backstroke stroke also has some characteristics which are unique:

only the arms and hands are used for propulsion,

all movements are underwater,

the body stays flat-level in the water with no rocking,

the hands are used continuously as efficient hydrodynamic lifting foils: drag plays no useful role in this stroke,

water as shallow as a wading pool can be successfully navigated,

there is a "low gear" and a "high gear" in the swamp stroke, that is, the best hand movement at high speed is fundamentally different from the best hand movement at low speed.

Swimming the swamp backstroke I have been able to achieve a top speed of about 1m/sec. That's done without heroic effort (I'm 56 and not an athlete.) A competition-level freestyle sprint would be twice as fast, but the swamp stroke uses much less of the body's musculature and is nearly silent. Because propulsion in the swamp backstroke is hydrodynamically efficient, I hold out hope that there is a speed (somewhere below one meter per second) where the swamp backstroke is the most metabolically efficient way to cover long distances. In shallow water at least, that's likely to be true.


HOW TO DO THE SWAMP BACKSTROKE

This is not a well developed stroke, so will not to try to be specific about my own arm and hand movements, they are probably not optimal anyway. Also, when it comes to rapid underwater movements of the hands, you will find the water has a large say: what you are trying to do isn't exactly what the water makes you do.


BODY POSITION

I will be specific about keeping your body in a trim position. When floating on your back the natural tendency is to raise your head and let your butt hang down an inch or two. You certainly can do a swamp backstroke in this posture, but it will be like dragging a parachute. You must get your butt up to achieve any speed, and this requires letting your head back, ears in the water, and arching your back slightly.


HAND MOVEMENTS: LOW-GEAR

You can find the hand movements for low-gear by standing in deep water and learning the feel of unseparated hydrodynamic flow over your hands. Palms facing down, move your hands back-and-forth from side-to-side at various angles of attack. The force of the water against your palm can be surprisingly strong. Then, suddenly, at too great an angle of attack, the flow stalls (separates) making the flow over the back of your hand feel bubbly and less dense. Efficient propulsion requires staying in the unseparated, unstalled regime. Experiment standing in deep water till you are satisfied you can produce a strong downward thrust while moving your hands near your hips. Fingers fully extended and held tightly together work best.

Now, do the same hand movement while floating on your back, and you're off!

Steering in the swamp backstroke is accomplished by simply exerting less thrust on one side. See what variations make you go faster. Get comfortable swamping in low-gear—and used to anticipating and avoiding obstacles—before trying to learn high-gear.


HAND MOVEMENTS: HIGH-GEAR

The limitation of low-gear is that once you start moving through the water with some speed, the relative direction of the water approaching your hand changes. It soon becomes anatomically impossible to rotate your wrist far enough to stay in the unstalled regime on each sweep of the hand.

Notice that in low-gear the flow over your hand alternates: at alternate times the thumb-side or the pinky-side of your hand forms the leading edge of the airfoil. To achieve higher speed through the water you must transition to a non-alternating flow where the the thumb-side of the hand is always the leading edge. This transition proves easy, but it must be done at speed since the new hand movements would be totally ineffectual, and even nonsensical, in still water.

While swamping at speed, you rotate your hands so that the thumb-side faces the oncoming water. This requires lowering your elbows (which can be a problem in very shallow water.) Keep your hands underwater and place your elbows as deep as possible—that will leave you in a position where your hand is a straight extension of you forearm, the both being inclined about 45 degrees to the water's surface. In that position all pitch rotations of the hand originate at the elbow.

Don't think about what you are going to do, or how it can possibly propel you forward. (As I said, the high-gear movements would be nonsensical in still water.) Concentrate only on doing work against the hydrodynamic lift force on your hands.

Lift is the sideways component of the hydrodynamic force, it is always perpendicular to the direction of the flow, and it is non-dissipative. That means that 100% of the work you do against it goes into increasing the kinetic energy of the flow. In this case, it efficiently moves you forward through the water at a respectable clip.

In my experience, fast, small hand movements near the hips are best. I'll be interested to hear your results.


Monday, August 15, 2011

The Plain Weaving Theorem again: The Vending Machine Algorithm

I am again writing about the Plain Weaving Theorem that Akleman, Chen, Xing, and Gross demonstrated by a topological proof in 2009. In essence the PWT states that every connected map specifies an enantiomorphic pair of plain-woven baskets. By plain-woven it is meant that every weaving element goes over-and-under in strict alternation—which is not exactly the way the term is commonly understood in the fiber arts. In knot theory terms, a plain-woven basket is an alternating link whose projection is properly embedded in a surface.

A connected map can be thought of as a connected drawing of lines and vertices on a surface such that, firstly, lines do not cross (other than at vertices;) and, secondly, cutting along all of the lines would cut the surface up into simply connected regions called faces. In other words, none of the cut-out pieces of surface would contain a hole or handle. Thinking about possible drawings on the surface of a tea cup (one with a handle) may clarify the above definition.

The PWT establishes an incredible ubiquity for weaving. There is left no firm foundation for considering maps, triangulations, dessins d'enfants, or any other familiar mathematical bricks, to be more fundamental building blocks of surfaces than weaving.

THE VENDING MACHINE ALGORITHM

Hoping to describe the practical application of the Plain Weaving Theorem in a memorable way, I introduce the Vending Machine algorithm for converting a map into a weave pattern:

Given a map drawn on a surface, place a vending machine midway between the two ends of each edge. Pedestrians will now fully short-cut the corners of the original faces. The pedestrian paths show the paths of the weaving elements. The pesky over-and-under weaving business at the vending machines is settled by choosing a left- or right-handed wood screw. Insert the screw in the middle of each face and incline the nearest weaving elements going around the screw to conform with the inclination of its threads. That being done, the over-and-under business takes care of itself, and you've got a basket.


Undip as a formal language


A formal language equivalent to undip, and its application to building hamiltonian planar cubic (i.e, trivalent) maps, is described in Shuffle of parenthesis systems and Baxter permutations by Robert Cori, Serge Dulucq, Gérard Viennot (1986):

"...hamiltonian cubic maps are planar maps with a hamiltonian circuit in which all vertices have degree three. In such a map any vertex is incident with only one edge not in the hamiltonian polygon, this edge may be inside the polygon or outside. Thus to build a "Hamiltonian rooted cubic map" one has to choose 2k vertices among the 2n (those incident with inside edges) then draw a planar map inside the polygon (it is easy to see that this can be done in C sub k [the kth Catalan number] ways) and a planar map outside. We have thus also an intuitive proof of the fact that the number of "hamiltonian rooted cubic maps with 2n vertices" is:


Their argument explains a surprisingly simple relation: the number of undip words of length 2n is given by the product of the nth Catalan number and its successor.

To share in the surprise it helps to know that finding hamiltonian circuits in trivalent graphs is sometimes difficult. The hamiltonian cycle problem is a special case of the traveling salesman problem obtained by setting the distance between two cities to a finite constant if they are adjacent and infinity otherwise. In fact the hamiltonian cycle problem in trivalent graphs is NP complete: it is known to be formally equivalent to finding boolean values of the variables that will make an arbitrary expression in symbolic logic evaluate as true (Garey, Johnson, and Tarjan, 1976.) Yet we garner from the above formula the exact aggregate number of rooted (i.e. choose a starting edge and a direction) hamiltonian circuits in planar trivalent maps with n vertices—though our posterity may never find them all.

It may seem a bit inelegant that we must count rooted hamiltonian circuits, thus counting each hamiltonian circuit multiple times—once for each way we could start and go around the circuit—but this kind of counting is very much attuned with a weaver's needs. If we are making a basket, especially a large one, it can matter very much the order in which it is built, so it is good to count our options.

Note that since this counting distinguishes ud and np (for example,) it presumes an orientation. Being a genus zero (planar) map guarantees that the surface our basket is embedded in is orientable. We must still choose one of the two possible orientations: i.e., we must specify which of the two sides of the embedding surface we are looking at. Only then are the baskets ud and np distinguishable.


UNDIP AS A FORMAL LANGUAGE

Starting from the empty word, every word in undip can be formed by a succession of two-letter insertions (ud or np)—between letters, at the beginning , or at the end of the word—and two-letter shuffles of pairs of adjacent left/right characters past each other. Furthermore, the result of such a process is always a word in undip. Therefore the insertion rules and the shuffle rule constitute the formation rules of undip.


THE LEFT AND RIGHT DYCK LANGUAGES

The subset of undip words that can spelled with just the letters u and d are clearly formed using only the ud insertion rule. Such a rule forms the Dyck language on {u, d}. We will call this subset of undip the left Dyck language. Similarly, the subset of undip words that can be spelled with just the letters n and p are called the right Dyck language.

The Dyck language is familiar to us in the ordinary rules for using parentheses. For example, a sequence of parentheses that would be valid in a mathematical expression, such as,

(()())()

can be formed starting from the empty word by successive insertions between characters, at the beginning, or the end of the word, of the two-character sequence ().


UNSHUFFLED UNDIP WORDS

Starting with some word in undip, say

uunddupd ,

the shuffle rule allows us, step by step, to gather the left characters to the front of the word and the right characters to the rear. The end result is an unshuffled undip word. For the word above such a possible sequence of shuffles is

uunddupd
uunddudp
uudndudp
uuddnudp
uuddundp
uuddudnp
,

resulting in the unshuffled word uuddudnp after five shuffle mutations.


DESCENDANCE FROM DYCK BASKETS

Since the anterior portion of an unshuffled word has been formed by ud insertions, it is a left Dyck word, and likewise the posterior portion of an unshuffled word is a right Dyck word. Since each of these portions is, in itself, an undip word, we can employ the converse of the rule that any undip word can be inserted into any other undip word, and thereby separate these two concatenated undip words:

uuddudnp = uuddud + np

Let's see the above process above in terms of the baskets the words describe. We began with the polyhedral (i.e., 3-connected) basket uunddupd and mutated it incrementally through a sequence of five shuffle mutations into the 2-connected basket

uuddudnp .

We then parted it into two baskets, one described by a left Dyck word, the other described by a right Dyck word, or, what we will call a left Dyck basket and a right Dyck basket.

Every step is reversible: we may now rejoin the two baskets and, one by one, invert all of the shuffle mutations until we regain the original basket.

Therefore: Every undip basket is descendant by a sequence of shuffle mutations from the union of a left Dyck basket and a right Dyck basket (either of which may be null.)

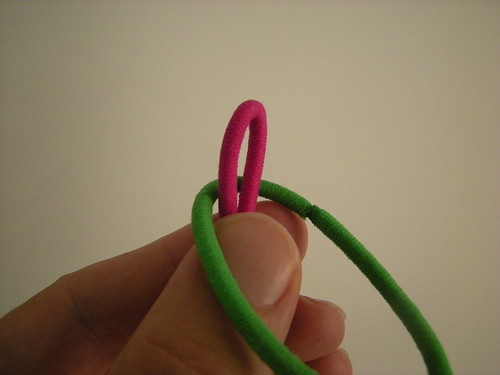
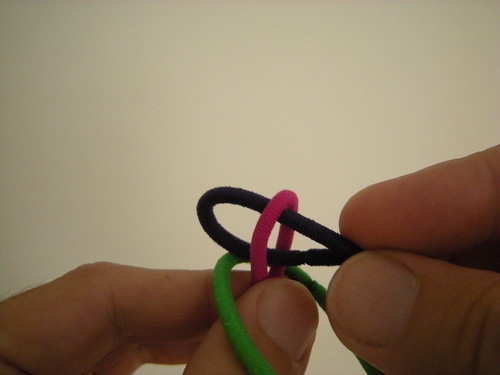
This slide show shows the descent of the basket above using paper twogs.


Friday, August 12, 2011

Making new undip words

Any undip word can be inserted anywhere in any other undip word. The resulting basket will be only 2-edge-connected at the splice. Shuffling can fix this. Shuffling is when adjacent letters that are left/right (e.g., up) or right/left (e.g., pd) switch places. Shuffling is always permissible.

Conversely, anywhere an undip word appears in another undip word (that would most commonly be ud or np) it can be deleted.

The pairs du and pn can also be deleted anywhere they appear. I call this a rewire mutation since it redirects a photon. The converse, inserting these pairs, cannot be relied upon to be viable. There is a special context where absorb/emit events can be inserted: between emit/absorb events on the same side.

The most fun way to make new undip words is to doodle them. Using graph paper make a doodle that stays on the graph paper lines. The rules of the game are that your doodle must start and end at the same place (the origin) and never go below or to the left of that point. In math terms it must not cross the x or y axis.

The path is encoded to an undip word in this way: each step up is a u, each step down is a d, each step out (i.e., to the right) is an n, each step back (i.e.,to the left) is a p.

Thursday, August 11, 2011

Make a Pony-O Basket from a Word

I'll just show you how to do it here. Details on the tiny bit of particle physics involved and on the undip language itself are covered in my 15-minute video, Make a Basket from a Word.

THE BASIC MOVE: QUOIT-THROUGH-THREAD

Three Pony-O's can be interlooped in what may properly be called a Mrs. Bright's knot (a three-way version of knot #2425 in The Ashley Book of Knots,) but to make things easier for us to remember, we'll call it Quoit-through-Thread, or sometimes just QTT. Try this right now:


Step 1: Hold NEEDLE upright.

Toss QUOIT on NEEDLE.

Insert THREAD through NEEDLE.

Pull QUOIT through THREAD.

Voila!


Once you feel comfortable making Quoit-through-Thread as shown, try inserting THREAD from the left so that QUOIT ends up on the right. Another way to do this variation is to feed THREAD halfway through every time and just pull QUOIT up through the side you want it on.

In making a Pony-O basket, QUOIT always represents a photon, while NEEDLE and THREAD always represent the electron in differing energy states. In the pictures above, the photon color is green, and the two energy colors of the electron are purple and pink.


UNDIP

Undip is a language that tells stories about an electron. We'll choose this undip word,

uunddupd,

and find out what shape it makes. Along the way you'll hear the story of the electron and learn to read undip.

You need three colors of pony-O's, 4 pony-O's of each, plus one extra pony-O of any color you like. (You'll always need three colors, and of each color you will always need half the number of letters in the undip word; you will also need one extra of any color to finish off the work.)

Hopefully one of your colors will really stand out. Make that color your photon color. In the photos I'm using bright green as my photon color.

The other two colors are energy colors. The energy of an electron always changes when it emits or absorbs a photon, so our electron's energy state alternates between these two colors at each photon event.

Print or write down the undip word above in lowercase letters. Then turn the page 90 degrees so that you are reading the word from the bottom up.

To begin, choose a pony-O in one of your energy colors. It will become NEEDLE in your first Quoit-through-Thread.

The first letter in this undip word, 'u,' says that our electron emits a photon to the left. Choose a pony-O in your photon color and use it as QUOIT. Emitting a photon changes (decreases) the energy level of an electron, so use the other energy color for THREAD. Make sure QUOIT ends up on the left at this event since we are emitting a photon to the left.

If that QTT went well, you've completed your first photon event.

The next letter is also 'u.' The undip word says that our electron emits another photon to the left. Use the free end of the OLD THREAD (it has the current energy color) as NEEDLE in the next QTT. Repeat the steps above to emit another photon on the left. Remember to change your energy color at each event.

The next letter is 'n.' The undip word says that the electron emits a photon to the right. That's going to be easy: its just like the first two events except that QUOIT ends up on the right. Remember to change your energy color; and by the way, never let go of the current energy state! A good electron never loses track of its energy. For that matter, don't let the work start getting twisted up or your electron will start confusing left and right.

If you set your work down,failing to mark where you were, note that there are only two energy-colored Pony-O's, those are the first and the last. Comparing the first few events with the begining of the undip word should sort out which end is which.

The next letter 'd' is a little different. The undip word says that at this point in the story our electron absorbs a photo on the left. As you might expect, we'll be bringing a photon-colored QUOIT in from the left, but this time it is one of the photons already emitted. We find that photon by running a hand back along the left side of the work. The first loose end we come to is our QUOIT. This time, put QUOIT through THREAD as the first move; then QUOIT on NEEDLE; and then THREAD through NEEDLE. You may choose to always make QTT in this order, but I tend to fumble with it. Absorbing a photon always changes (increases) the energy level of a photon, so THREAD is a different color from NEEDLE this time as well.

The next letter is another 'd'. The undip word says that our electron absorbs another photon on the left, so repeat the previous event, again tracing your hand back along the left side of the work to find the photon to use as the quoit, and bring it in from the left.

The next letter is 'u': again we emit a photon to the left.

The next letter is 'p'. That says that our electron absorbs a photon on its right. This time we trace a hand back along the right side of the work to find the photon we will bring in from the right side. You'll find this photon is a long way back, but as always, its the first one we come to.

The last letter is 'd.' An undip word tells a story that implicitly repeats, so the story is not over just because we have come to the last letter of the word. We are headed back to where we started (and our basket will be finished) but our electron will be headed out for another lap. The 'd' says that the electron absorbs a photon on the left, so trace back along the left to find the photon and bring it in from the left as QUOIT.

At this point we want to bring the only remaining free end (notice that it is none other than our first energy state) as THREAD. This presents a problem because this THREAD is already attached to the work. So this time we toss an extra Pony-O named OUTIE over THREAD before beginning the knot. Things now proceed normally until we would normally pull THREAD through NEEDLE: we pull OUTIE through instead. OUTIE, can be tied off in an a snug overhand knot to keep things from unravelling and to mark where it all began.

Bravo! You've done it!


Wednesday, August 10, 2011

undip dictionaries published

I have just published unabridged, illustrated dictionaries for the undip words of 2, 4, 6, 8 and 10 letters. The illustrations, unfortunately, are just the lattice walks corresponding to the words—no basket shapes yet.